TP Link Deco Ethernet Backhaul Setup: All You Must Know
With the help of the Ethernet Backhaul feature, you will be able connect your Deco units using a LAN cable. It means, Deco units present in your home network will be able to transmit data through an Ethernet connection. There’s no doubt that wired connections are more stable than wireless ones. Thus, data transmission rates will be higher. If you establish an Ethernet backhaul between your Deco units, WiFi backhaul will disconnect automatically. This post will guide you on how to perform TP Link Deco Ethernet Backhaul setup. Also, we will try to answer some questions related to the topic.
How to Set Up Ethernet Backhaul with Deco Devices?
The steps to complete TP Link Deco Ethernet Backhaul setup are given below. You are suggested to ensure that you have access to non-damaged Ethernet cables. Otherwise, there will be no benefit of using the Ethernet backhaul.

- First of all, complete the TP Link Deco setup process for all the Deco units on the same network through WiFi using the Deco app.
- Once done, you are suggested to place the satellite Deco at their suitable locations in order to get the best coverage.
- Thereafter, get access to Ethernet cables and hardwire your Decos.
- You do not need to change any setting by accessing the web GUI or the Deco mesh app.
- The TP Link Deco Ethernet Backhaul will start working automatically.
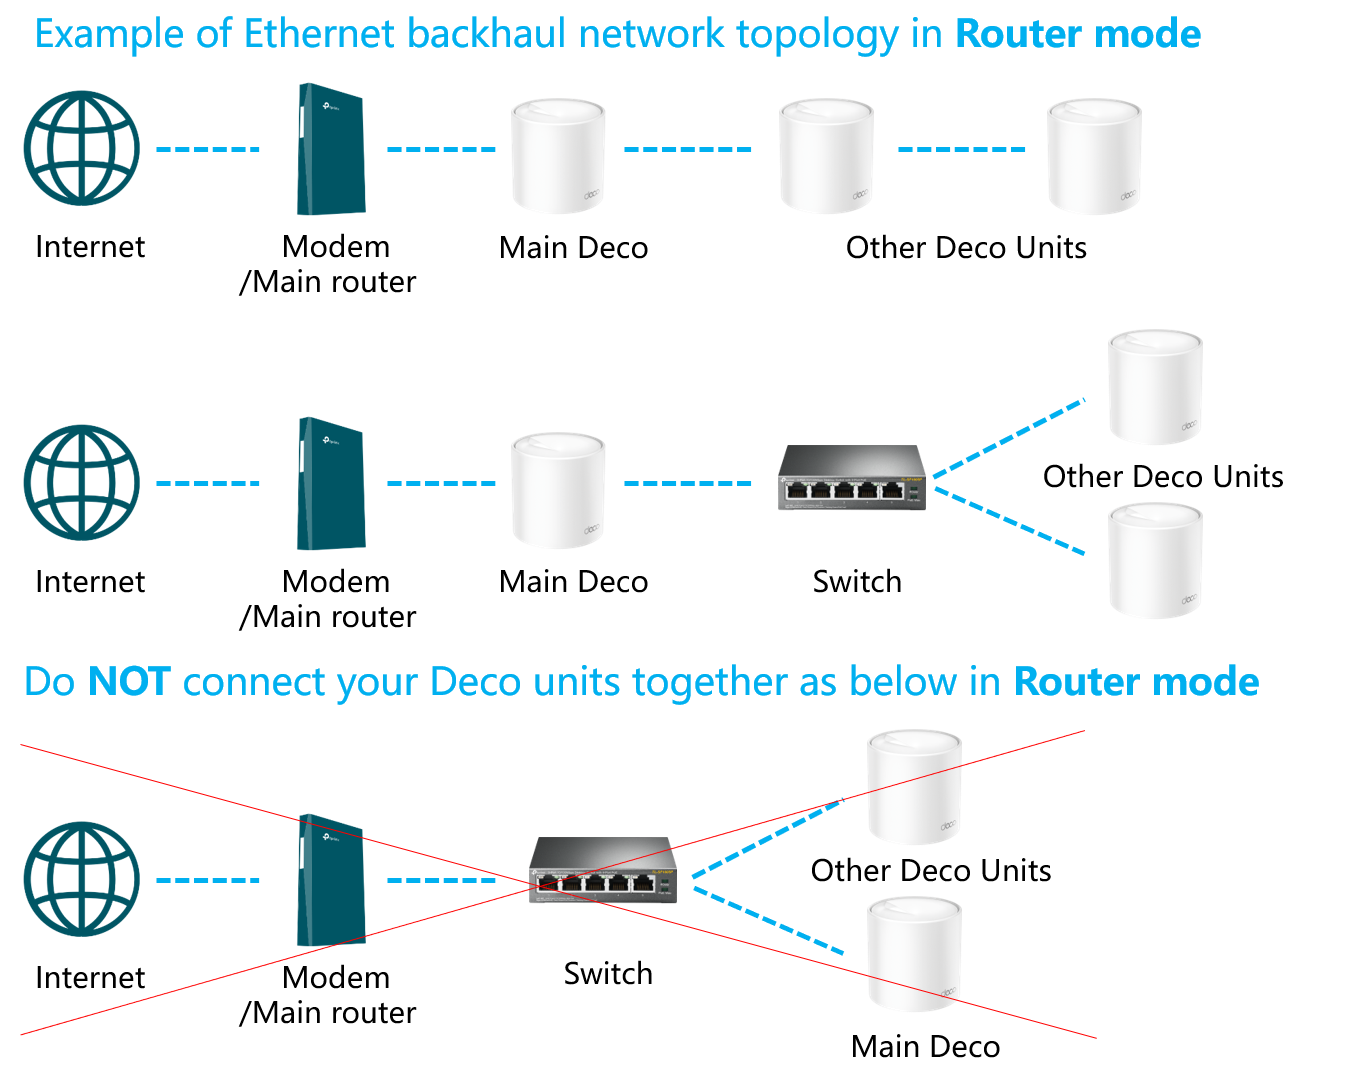
Note: The TP-Link Deco works in the Router mode by default. Thus, you should wire the satellite Deco to the LAN port of the main Deco. Just in case, you have used a switch in between, it is supposed to be connected to the main Deco’s LAN port. This, in result, will prevent a network loop.
You should know that if you have completed the Deco setup in the Access Point mode, you are free to wire the satellite Deco to the main satellite as well as another satellite Deco unit.
How to Check If TP Link Deco Ethernet Backhaul Setup is Successful?
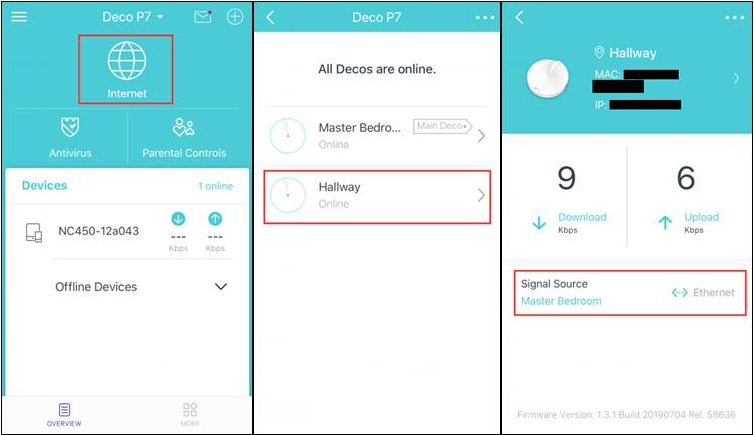
After connecting your TP-Link Deco units using a Ethernet cables, you are suggested to check the success of the connection. For this:
- Launch the Deco app.
- Tap the Network map.
- Select the satellite Deco.
- You will be able to see to which Deco it is connected and whether the connection is WiFi Backhaul or the Ethernet Backhaul.
Which Switch Models Can Work with TP Link Deco Ethernet Backhaul?
Most switches that we can see today support the Ethernet Backhaul feature. For your ease, we have mentioned two few models for you:
- TP Link TL-SX1008 8-Port 10G Desktop/Rackmount Switch
- TP Link TL-SG3210 JetStream 8-Port Gigabit L2+ Managed Switch with 2 SFP Slots
Is It Important to Wire All Deco Units to Use the Ethernet Backhaul Feature?
No, it is not important to hardwire all the Deco units together. It is completely up to you which Deco unit should be connected via an Ethernet Backhaul and which must use the WiFi Backhaul. The following setup will also work.
Troubleshooting: TP Link Deco Ethernet Backhaul Setup Failed
There are chances that you will be able to set up the Ethernet Backhaul on your TP-Link Deco devices. In that case, you are suggested to take the help of the tips given below:
- Log in to your Deco unit and verify if there is the IPTV feature enabled. For your information, IPTV ports cannot use Ethernet Backhaul.
- Try establishing the wired connection using another Ethernet cable/port.
- In case, you are using a switch to connect two Deco devices, you are suggested to connect them directly. If that works, then the problem might be with the switch.
- We recommend you turn off the loop detection function on your switch.
The Concluding Thought
We are now about to wrap up the post that explained the process of TP Link Deco Ethernet Backhaul setup. It is expected that you’ve got answers to all your queries. Just in case, you are planning to add two different Deco models in the same network, you can do that too. On the off-chance, you want to turn off the Ethernet Backhaul, simply remove the Ethernet cables.


