Deco X20 Adding Units: Step by Step Process
Here we will make it simpler. You will get to learn Deco X20 adding units and cover more area in your Deco network. So, let’s start this TP-Link Deco setup guide.
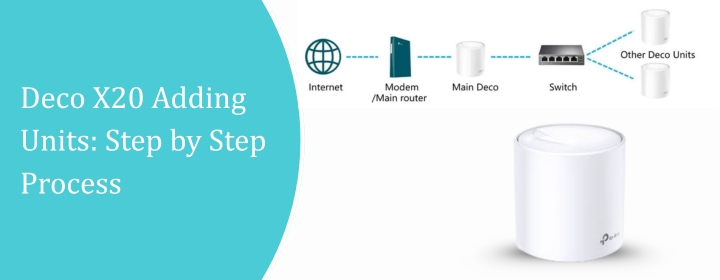
How to Add More Satellites (Deco X20 Adding Units)?
- Pick your spots first: A good rule: half the distance between your main router and the dead zone. Don’t go too far satellite needs signal to talk to the main unit. If it’s too weak, it won’t work.
- Power it up: Plug in the new Deco. Wait for the LED to blink. Don’t panic if it takes a minute it’s supposed to.
- Open the Deco app: This is where the magic happens. You can’t just press buttons on the unit. App only. Tap “Add a Deco” > pick your model > follow the steps.
- Follow the blinking lights: The app will tell you what the lights mean. Usually: yellow = connecting, blue = ready, green = good. Ignore red unless it stays red for ages.
- Name it or leave it default: You can name it “Kitchen Deco” or whatever. Honestly, doesn’t matter much, but it helps if you start having 5+ units.
- Test it: Once it’s online, walk around and check signal. If it’s weak, move it a few feet closer to the main unit. Sometimes a tiny shift fixes all your headaches.
- Repeat for more satellites: Rinse and repeat for each new unit. Deco handles multiple satellites pretty well, so don’t stress if you have 3–4 more to add.
Where to Place the Added Units?
Main Unit:
Keep your main Deco (the one plugged into your modem) somewhere central if you can. Not in a closet, not on the floor. A shelf, table, anything that’s kind of open. Walls and corners suck for range.
Extra Units:
This is where most people mess up. Don’t just toss them anywhere. Think in “hops.” Each unit needs to still get a decent signal from the previous one. A bad placement is worse than none.
- Avoid thick walls, metal stuff, and big appliances. Fridge, oven, filing cabinets — all signal killers.
- Ideally, put each unit halfway between the main Deco and the dead zone you’re trying to fix. Not too far, not too close. Test and move. Seriously. It’s trial and error.
- Keep them elevated. Floor placement is fine if you have to, but higher is better. Wi-Fi spreads sideways and down mostly, not up.
Outdoor/Long Hallways:
If you have a long hallway or a weird corner, put a Deco in the middle. Don’t try to blast through walls. One unit in the hallway works better than hoping the main Deco can reach the end.
Once the Deco units settle down, you’ll see Deco blue light means the devices are installed.
Troubleshooting Tips: Deco X20 Adding Units
- Placement is everything: Deco units are picky. Think “halfway between main router and dead zone.” Too far from the main unit and it’ll fail to join. Too close and you’re wasting hardware. Also, keep it away from microwaves, thick walls, metal shelves: basically, anything that looks like it could kill Wi-Fi.
- Reset before adding: This one trips a lot of people up. New Deco sitting in a box? Press the reset button until the LED flashes. Sometimes it’s just stuck in some weird state from the factory. Reset it, then try adding again.
- Update the app and firmware first: Sounds obvious, but it’s wild how many folks ignore this. Go into the Deco app on your phone. Make sure the main unit has the latest firmware. Some units won’t join the mesh unless everything is up-to-date.
- Add units slowly: Don’t try adding three at once. One at a time. Add it, let it connect, test, then move to the next. This also helps you spot if one unit is acting up instead of guessing which one is causing problems.
- Watch the LED: Deco LEDs tell you what’s up. Solid blue usually means it’s connecting, flashing blue might mean it’s stuck. Green = good. Red = nope. If it’s flashing the wrong color, unplug, reset, and try again.
Ending Words
Hope, you have successfully completed the task of “Deco x20 adding units” and now covered most of the house to into Deco internet network.